Schlosser Designs

Easy Quick Crafty Projects for Everone!

  • About
  • Advertise
  • Ahoy Tote
  • Beach Towel
  • Blog
  • Cabana Lane
  • Cart
  • Castle Lattice
  • Check Out Success
  • Checkout
  • Chopsticks Tote
  • Contact Me
  • Events
  • Fife Tote
  • Flower Garden Quilt
  • Garden Party Hopscotch
  • Grocery Tote
  • Holiday
  • Home Decor
  • Kate Tote
  • Kitchen Fun
  • Lovestruck Quilt
  • My Account
  • Pattern Corrections
  • Patterns 101
  • Petal Panache Cushion
  • Press
  • Privacy Policy
  • Sewing
  • Sewing Machine Apron
  • Shop
  • Shop FAQ
  • Support Your Local Quilt Shop
  • Terms and Conditions
  • Tutorials
  • Wholesale Info
  • Archives
    • Twitter Feed
  • Project Gallery
  • Store

Ribbon Napkin Rings

August 5, 2009

I found this awesome striped ribbon on clearance at the fabric store and knew I could do something with it.

StripedRibbon

I let it sit for a few days on my craft table while I mulled over what to do with it…and here’s what happened!

Ribbon Flower Napkin Ring

Want to make your own?  It’s easy!  Here’s how:

Gather the following supplies:

Ribbon for napkin ring, flower and leaves.

Needle and thread

Hot Glue Gun

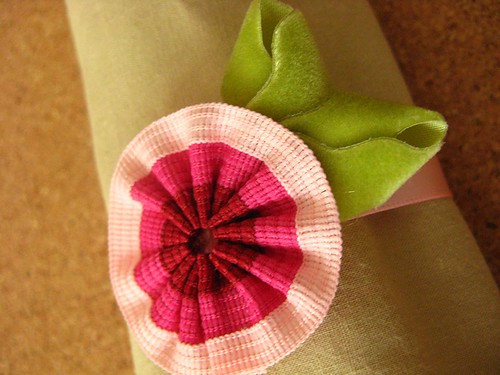
Cut a 5″ piece of ribbon for the flower and one for the napkin ring.  I used a plain pink satin ribbon for the ring part.

Turn under one edge and hand stitch (or machine if you prefer) to make a ring.  Do this for both the flower and napkin ring ribbon.

Set aside the napkin ring get ready to do a little loose stitching around one edge of the flower ring.  You can see my clear thread in the top of the red section there in the picture.  Don’t forget to knot one end so it holds!

Stitching Close Up

Pull tight and gather the ribbon around the stitches.  Pull it tight, but not too tight.  (If you lay it on a flat surface and it doesn’t lay flat you’ve pulled it too tight.)  Tie off the thread so the gathered ribbon flower holds in place.  You’re almost there!  Set this aside and grab your leafy ribbon.

Ribbon Flower

You only need to cut a few 1″ pieces to make your leaves.  I used this green velvet ric-rac that I got from a scrapbooking store.

Ribbon turning into leaves!

Fold over the ribbon pieces to make a few leaves and use the hot glue to hold in place..

Finished leaves

Glue your leaves to the back of your flower, then glue the completed flower to the seam you sewed on the napkin ring.  You’re done!!

Ribbon Flower Napkin Ring

Posted Under: Uncategorized

« Back-To-School Teacher Gifts
Ribbon Flower Embellished Card »

Comments

  1. ILikePaperCutting says

    January 19, 2010 at 4:34 am

    creative idea, thanks.

  2. Tiff@Dogwood Lane says

    March 11, 2010 at 2:56 pm

    What a fun idea a great one for easter!

  3. Jane Moody says

    July 5, 2010 at 3:16 pm

    Very beautiful. This will go great with my candy roses. A+ for creativity

Trackbacks

  1. Ribbon Flower Embellished Card | Schlosser Designs | Blog says:
    August 7, 2009 at 3:06 pm

    […] so I got a little carried away with these ribbon flowers and made a few extra.  Then I experimented with some different widths of ribbon.  Here’s a […]

My name is Erin and I <3 to make stuff! Whether it’s sewing, paper crafting, home decor, or yummy food in the kitchen, this blog is my way of sharing the projects I’ve been working on!

  • Facebook
  • Pinterest
  • Twitter
  • RSS

Newsletter

Sign up for news, events and promotional information

  • About
  • Advertise
  • Ahoy Tote
  • Beach Towel
  • Blog
  • Cabana Lane
  • Cart
  • Castle Lattice
  • Check Out Success
  • Checkout
  • Chopsticks Tote
  • Contact Me
  • Events
  • Fife Tote
  • Flower Garden Quilt
  • Garden Party Hopscotch
  • Grocery Tote
  • Holiday
  • Home Decor
  • Kate Tote
  • Kitchen Fun
  • Lovestruck Quilt
  • My Account
  • Pattern Corrections
  • Patterns 101
  • Petal Panache Cushion
  • Press
  • Privacy Policy
  • Sewing
  • Sewing Machine Apron
  • Shop
  • Shop FAQ
  • Support Your Local Quilt Shop
  • Terms and Conditions
  • Tutorials
  • Wholesale Info
  • Archives
  • Project Gallery
  • Store

Content and photos © 2026 Erin Schlosser | Log in