I sketched out this idea I wanted to try a few weeks ago and pulled out the supplies to make it. I thought it would be fun to do a stamped pattern on shrinky dinks to make some fun earrings then add some embellishments for a little more texture! I think they turned out well! A great colorful accessory for the coming summer!
This project actually has two separate parts to it. First off we’re going to make a shrinky dink ruler. Trust me, this will make ALL your shrinky dink projects easier from here on out! This is how you’re going to know for sure how much your plastic will shrink! It always says 1/3 …but who wants to do the exact math on that?!? Not me!
Tools for the first part of the project:
1 sheet Shrinky Dinks-Frosted Rough and Ready
1 ruler
Embossing Heat Tool
various colored pencils
Cut a piece of shrinky dink out that’s 10″ long and 1/2″ wide. Next you’ll want to line it up next to your regular ruler and transfer all the measurements onto your piece of shrink dink. I used blue for all the 1″ lines, green for all the 1/2″ lines and black for the 1/4″ lines. Using a colored pencil works well, the sharper you have it, the finer your line and the more accurate your “ruler” will be. If you think it will be easier for you, don’t be afraid to write in the numbers below the marks too!
After that, just shrink it! I use my Embossing Heat Tool for the shrinking process instead of the oven. Faster results, and you don’t have to heat up your entire oven for a few little plastic pieces! Here’s what it will look like finished:

See how all the different colors make it easy to spot each 1″, 1/2″, and 1/4″ measurements? Now we’ll use this to determine how big our piece needs to be cut so that it shrinks to the right size for our project.
For the earrings you’ll need:
Shrinky Dinks-Frosted
Pigment Stamp Ink
Silver stickers
Basic jewelry making supplies (wire, pliers, coordinating bead, earring hooks)
For our earrings I wanted something that shrunk to be 5/8″ x 1 3/4″. I drew a box on some scratch paper that was actually 5/8″ x 1 3/4″ then “measured” is with my shrinky dink scale.

You can see that the 5/8″ piece actually measures 1 1/2″ according to the shrinky scale. (Remember the blue is 1″ and the green is 1/2″.)

And the longer 1 3/4″ side actually measures 4″ with the shrinky scale.
Now we’ve got our measurements for the shrinky dink piece: 1 1/2″ x 4″! Go ahead and cut out two pieces to this measurement:

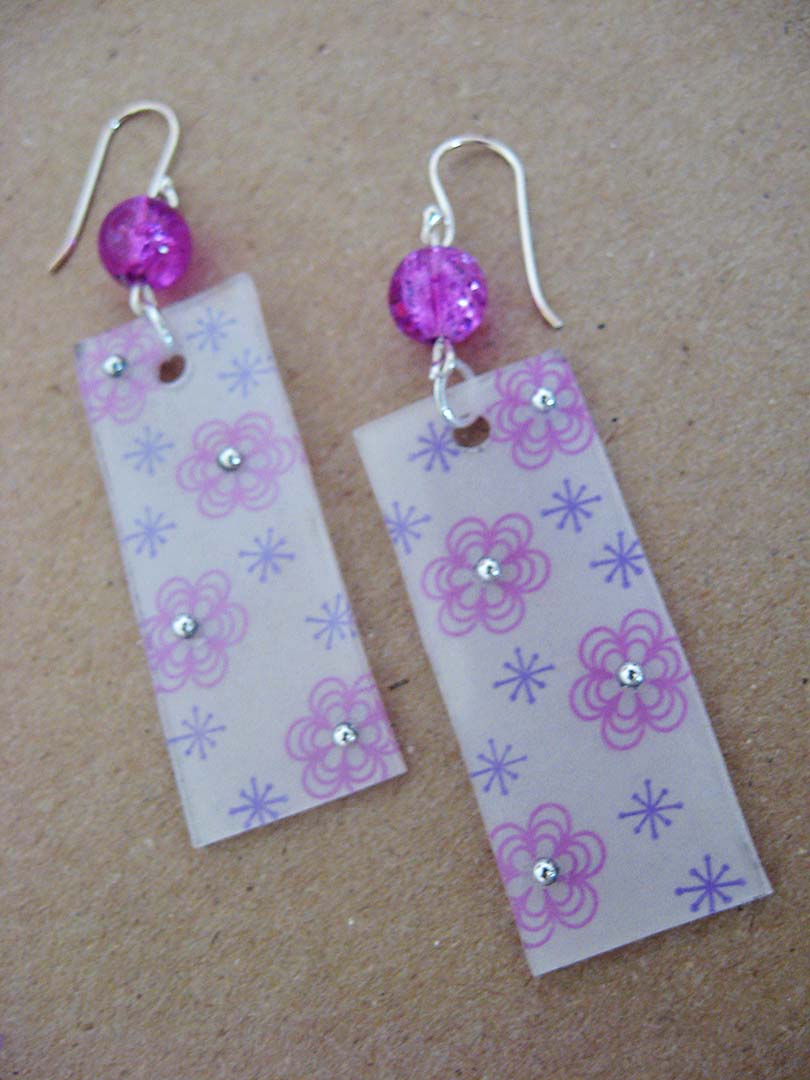
Now stamp away! Use your permanent pigment ink and stamp a pattern onto your shrinky dink pieces. I used one shape from the Outside The Box stamp set and one shape from the Build A Border set.

Don’t worry about the colors not being too bright, when they shrink they will be more saturated and noticeable! (Tip: Punch your holes to attach these to your earring hooks now, before you shrink them! I didn’t do that and it made it a little harder to punch the holes…my Crop-A-Dile had to come to the rescue for that one! Punch your holes in the middle near the top!)
Now shrink! It’s really easy! I even did a little video so you can see how fast it works with your embossing gun! It can get a little out of control and sometimes it won’t flatten as soon as it’s done, so you’ll see in the video I used an empty acrylic mounting block to flatten it as soon as I turned off the heat gun. (There’s no sound…I muted out all the embossing gun noise!)
Here’s a shrunken one and a non-shrunken one. See how the color is more saturated?

Shrink your other one and punch the holes if you forgot to do that before your shrunk it.

Now add your little silver stickers:

We’re almost done! Just a little bit of wire work and we’ll be all done! Make a small loop in your bendable wire like so:

Then add your coordinating bead and loop the other end.

Loop one end around the earring hook and the other around a small jump ring that’s attached to the whole in the top of your shrinky dink piece. You’re all done!

Happy Crafting!

What a neat idea! I just saw a video on Shrinky Dinks on DIY Dish the other day and am totally hooked!
I adore these. Thet came out so cute. I’d totally wear them! They’d make a cute accessory paired with the right sundress. Good job!
Shawna
Love this idea, just bought my supplies but I have a question about the video. You use something to smooth out your piece and I was just wondering what is that? How does your piece end up so flat? It looks perfect!
Just wanted to chime in to try answer your questions. It looks like a small piece of very thick acrylic to me.