Schlosser Designs

Easy Quick Crafty Projects for Everone!

  • About
  • Advertise
  • Ahoy Tote
  • Beach Towel
  • Blog
  • Cabana Lane
  • Cart
  • Castle Lattice
  • Check Out Success
  • Checkout
  • Chopsticks Tote
  • Contact Me
  • Events
  • Fife Tote
  • Flower Garden Quilt
  • Garden Party Hopscotch
  • Grocery Tote
  • Holiday
  • Home Decor
  • Kate Tote
  • Kitchen Fun
  • Lovestruck Quilt
  • My Account
  • Pattern Corrections
  • Patterns 101
  • Petal Panache Cushion
  • Press
  • Privacy Policy
  • Sewing
  • Sewing Machine Apron
  • Shop
  • Shop FAQ
  • Support Your Local Quilt Shop
  • Terms and Conditions
  • Tutorials
  • Wholesale Info
  • Archives
    • Twitter Feed
  • Project Gallery
  • Store

Tutorial Tuesday: Spider Favor Boxes and Spooky Votives

October 19, 2010

So this weekend I made a little spider box!

IMG_4146

What?  You don’t see it on my table?  This is what my table looked like while trying to figure out the pattern for that little box!  (I’m not a clean crafter, that’s for sure!)

IMG_4097

Then I took a nap-and my brain kept working on it.  I love how your brain is always working on solutions to problems, even if you’re not consciously working on it!  I woke up with the perfect solution and sketched it out right away:

IMG_4098

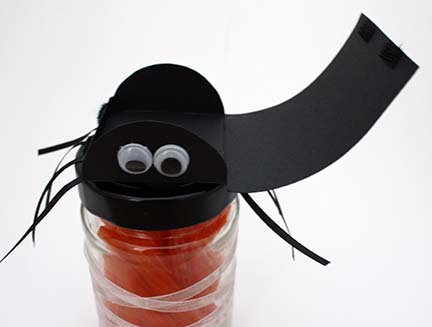
Want to make one?  I’ve got the template for you!  Just download the pdf, cut, and trace onto your best black spider paper, attach ribbon legs underneath and you’re done!

IMG_4106

To hold it shut black velcro works perfect!  It’s a great size for a small message and a piece of candy!  Doesn’t it look cute perched atop this jam jar watching over the treats?  I wrapped the jar in white organza to give it a little spider web feel to it.

IMG_4146

Ready for the next project?  Need some easy to make drippy and spooky votives for your Halloween get together?

IMG_4125

All you’ll need are some glass votives and red acrylic paint.  (I used the Christmas Red Folk Art paint from Plaid.)

Wash your votives so they are free of fingerprints, oils, and dust.

IMG_4120

Hold the votive at an angle and put a bead of acrylic paint around the inner top edge of the votive.

IMG_4122

To get it to get a good drip shape just tap the bottom of your votive on the counter top.  The drips will appear on their own.

IMG_4125

Just let them dry and drop in your LED tea lights!  Easy peasy!

Happy Crafting!

Erin

Posted Under: Uncategorized

« Meet the Design Team: Karen Baker
Tutorial Tuesday: Congrats Gift Card Holder »

Comments

  1. bonnierose says

    October 19, 2010 at 2:26 pm

    Love those red drippy votives.. fantastic!!!!!!

  2. Angie says

    October 19, 2010 at 7:59 pm

    Love the spider! Don’t know if I’ll do anything with it this Halloween, but for sure next year!

  3. June (planetjune) says

    October 20, 2010 at 11:16 pm

    That paint effect on the votives is so clever – I’d never have guessed it’d be so easy! Very cool.

  4. Jennifer says

    October 21, 2010 at 9:35 am

    That is awesome!!

    Hope you’ll link up for Craftify It Thursday! :D Also, we have a guest crafter – Kim from A Girl & A Glue Gun
    http://lebedafamily.blogspot.com/2010/10/craftify-it-thursday-guest-craft.html

    Jennifer @ Life with the Lebedas

  5. Janet says

    October 25, 2010 at 11:08 pm

    You are always so clever with those 3-D paper projects! Wish I could just take a nap and be so creative! Thanks for the idea.

  6. Janet says

    October 25, 2010 at 11:10 pm

    You are always so clever with those 3-D paper projects! Wish that I could just take a nap and be so creative! Thanks for the idea;)

My name is Erin and I <3 to make stuff! Whether it’s sewing, paper crafting, home decor, or yummy food in the kitchen, this blog is my way of sharing the projects I’ve been working on!

  • Facebook
  • Pinterest
  • Twitter
  • RSS

Newsletter

Sign up for news, events and promotional information

  • About
  • Advertise
  • Ahoy Tote
  • Beach Towel
  • Blog
  • Cabana Lane
  • Cart
  • Castle Lattice
  • Check Out Success
  • Checkout
  • Chopsticks Tote
  • Contact Me
  • Events
  • Fife Tote
  • Flower Garden Quilt
  • Garden Party Hopscotch
  • Grocery Tote
  • Holiday
  • Home Decor
  • Kate Tote
  • Kitchen Fun
  • Lovestruck Quilt
  • My Account
  • Pattern Corrections
  • Patterns 101
  • Petal Panache Cushion
  • Press
  • Privacy Policy
  • Sewing
  • Sewing Machine Apron
  • Shop
  • Shop FAQ
  • Support Your Local Quilt Shop
  • Terms and Conditions
  • Tutorials
  • Wholesale Info
  • Archives
  • Project Gallery
  • Store

Content and photos © 2025 Erin Schlosser | Log in