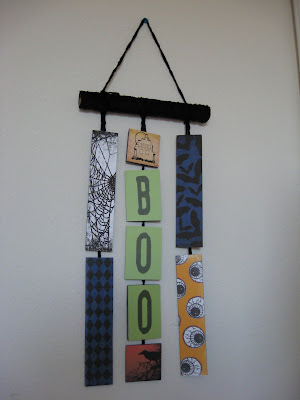
Here it is:
And here’s how it’s done. It’s pretty easy. I used two different FREE downloaded digital scrapbooking kits:
Coralee Evans, aka MzCora Halloween Mega Kit found at http://mzpimptress.vox.com. This kit is awesome! So many different papers and embellishments! (She just emailed me and let me know that her site where the Halloween Kit is found is down at the moment. If you leave a comment with your email I can email you the pages that I used to make the kit.)
Ronna Penner of Scrapadelic.com ExpressYourself alphabet found at http://www.scrapadelic.com/ (Well, it was found there, but I think it was a limited time only kit for free. The only thing I used from Ronna was the alphabet, which you could switch out the letters for any other font you feel like, but I still have to give credit to her.)
Anyway, just print out the pages onto white cardstock, trim to sizes below, glue/tape to foam core, tie together and your done.
The quantities and sizes of the pieces are as follows:
4- 2 1/4″ x 10″ paper pieces
2 – 3″ x 3″ paper pieces
3- 3″ x 4 1/4″ paper pieces (This is for the BOO pieces. You can print them out with the green background or if you have green cardstock, just print out the black letters onto the green cardstock to save a little of your ink cartridge)
Glue/tape them to foam core board and trim to the correct sizes. I hung all of them from a empty paper towel tube wrapped in black chenille yarn. Just put a stripe of glue down the tube and start wrapping! I connected all the pieces together by taping more of the black chenille yarn to the backs.
Finished Size: 12″ x 24″
Designer Tips:
I made mine to hang against a wall, but if would also make a great mobile. Just cover the backs of the pieces with solid or more printed pattern cardstock. (This designer tip is from Christian! Thanks!)
I originally designed this to be a Christmas wall hanging-use christmas colored paper and instead of the BOO you could have JOY, or put pictures of your family inside.
If you’re into quilting, this would also be great made from fabric! or wood, or…well you get the idea!
Also, since you’re only using small pieces, you can crop the papers down to size before you print them out, then you use even less cardstock and ink.
Any questions? Just ask!
Cute Erin, you are so creative!
I got the foam board today. I need new ink for my printer and I’ll be in business. I’m excited to try this.
Man I love your craftiness!! It is so fun to see all your fabulous ideas. How cute!
Dang! This is really cute! I am going to attempt one for Christmas with my yummy DSP from Stampin’ Up! (Of course!)
Thanks for sharing!
hi! thanks for the idea. yours turned out really cute! i would love the pages you used to make the kit. please send them when you have the time. thanks so much for sharing them!! (thanks to mzpimptress, too :)
jessimat@gmail.com