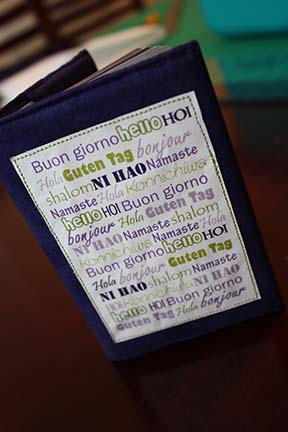
The next few weeks will be some travel inspired tutorials to get ready for those vacations you’ve got planned this summer! Today we’ll be making a passport cover! I’ve got all the directions on how to make your own AND a download for the covers I designed!
For each passport cover you’ll need to cut the following:
2- 12 1/2″ x 6″ pieces of fabric (I used micro-suede. It’s easily cleanable and not too bulky! A cotton would work well too.)
1-12 1/2″ x 6″ piece of lightweight interfacing (non-fusible)

Sew-In Colorfast InkJet Fabric Sheets for your printer (You can find these in the sewing section of any craft/hobby store.)
Coordinating thread
Your choice of which download you’ll be using for the front and back!
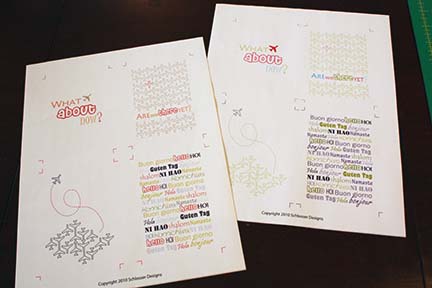
I’ve got the artwork download available in 2 different patterns with a total of 4 different colorways. Hopefully there’s something for everyone! One design has artwork with “Hello” in different languages on the front and an airplane design on the back. The other design has an airplane pattern on the front with the text “Are we there yet?” and the text “How about now?” on the back. (Click on the image below to download the PDF.)


First you’ll want to do a test print on a normal piece of computer paper.

This is just to make sure you’ve got everything right before you print something wrong on the fabric sheets. I loved how these printed so nicely! You can hardly notice a difference between the fabric and paper printout!

After they print, you’ll need to follow the instructions on the package to heat set the image. It was a really simple process that took no longer than 5 minutes. It involved heat setting the image, rinsing the image, patting dry the image, and re-ironing to dry and heat set the image. Below you can see one dry fabric sheet (on the left) and one wet fabric sheet (on the right).

It warns you to pat dry, and not to rub so I thought I’d give it a rub just to see what happens. Turns out it’s very easy to rub and blur the image when it’s being rinsed the first time. See where I rubbed the word Schlosser? It definitely got blurry quickly! (It’s permanent and won’t blur after the final dry and heat set, don’t worry!)


You’ll trim the front and back along the crop lines on the printout. Layout the front and back printout pieces according to the measurements below on your front main fabric piece:

(To find the middle, just fold the larger piece in half and crease with your finger.)

Stitch 1/8″ around the edge of the pieces.

Layer the two fabric pieces right sides together with the interfacing on top. Stitch 1/4″ around the pieces, leaving a 2-3″ opening along the short side. Clip the corners and turn right side out. Iron the opening and top stitch along both short sides. (Sorry, I forgot to take a picture of this step!) Fold ends in 2 1/2″, pin, and top stitch 1/8″ along the long sides to sew the pockets down.

Add your passport and you’re ready for some stylish travel!!

{Front}

{Back}
The colorways I made go with lots of different fabric colors so you can mix and match to your hearts content! (They’ll also make great card fronts.)


Enjoy!
Erin
P.S. If you make one I’d love to see it! Don’t forget to upload it to the Schlosser Designs Group on Flickr!
Wow, that is awesome! You are so good with graphic designing.
What a fab idea, I’d never heard of the fabric paper before…
That is the cutest thing! I love this project!
Hi,
My daughters school is planning a trip to Paris this spring. I am doing a lot of sewing projects and selling items to benefit the trip. Someone had asked me to sell passport covers for the kids to be able to use on the trip. I LOVE YOUR PASSPORT COVER DESIGNS!!! I have a similar pattern and also one that hangs from a string, but would love to offer them the design too. Would you allow me to use your cover design for this fundraiser only? If not…I understand…it is so neat though:)
Thank you,
Rachel Smith
Love your passport cover so much. Thanks for sharing!