Alright, how about another super quick project? I found this awesome clear transparency "paper" from Hambly Prints (I love Hambly Prints!) and thought it would look really fallish with an orange background. Is fallish a word? Anyway, here are the directions: Cut a 12" long, 1 1/2" wide strip of the orange paper. Cut in half and this will be the base for two napkin rings. Cut a 12" long, 1" wide strip of the transparency paper. Cut this one in half as well. From here, you can make the more modern one, or the one with the ribbon. Modern: Wrap around and staple. All done! Ribbon: Set two eyelets about 1/4" inside of the ends. … [Read more...]
Archives for September 2008
Tutorial Page Updated
I just updated the Tutorial Page today with some more fun Halloween projects from last year. So be sure to check out the following projects:Quick & Easy Accent PillowsHalloween Wall Art (I used some papers that were available last year, these can easily be substituted out, depending on the look you want.) … [Read more...]
Tutorial Tuesday-Embellished Candles
I can't believe it's time for Tutorial Tuesday already! This week's project will only take you about 1 minute. Yep, only one minute! For this project you'll need the following: Candles (Any color will work. Since the embellishments are NOT flame proof it doesn't matter too much what they smell like because we're not going to light them. Mine are peppermint, leftover from projects last Christmas.) Halloween/Fall themed ribbon Scotch Transfer Tape (The red Tacky tape will work too.) Now, cut a ribbon piece slightly longer than the circumference of your candle, put tape on the back, and tape the ribbon onto the candle. Done. Hint: … [Read more...]
Quick Glitter Card
It's been a while since I featured a card so here's a quick one for you: How did I get that fun green glitter accent you ask? I found this awesome tape at the craft store! It's CLEAR mounting tape. It's as strong as the foam mounting tape, but clear instead! To make the card I cut a overhead transparency in half, cut a piece of white cardstock slightly smaller, and ran the paper through the Cuttlebug to give it a little dotted texture. Isn't it cute! Then, just run a stripe of the clear tape up the front of the card, sprinkle on glitter, and your glitter border is done. It's that simple. Stamp the border and "Thanks" sentiment from … [Read more...]
Tutorial: Fabric Pumpkins
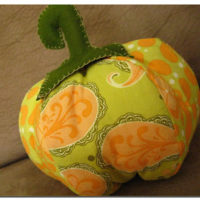
Ok, so I think I'm ready for fall, and in a pumpkin mood.... So here's today's tutorial! Fabric Pumpkins These ones will last you just as long as the pumpkin pets in the previous post, and are a little more lightweight. :) You'll need these three PDF's: Pattern: Panel Pattern: Stem Tutorial Instructions The finished size is about 7" around (not including the stem.) You can enlarge the patterns to make different sized pumpkins. I'm working on one about twice as large and will post a separate pattern for that one very shortly. The larger one will also have a fabric stem as opposed to a felted wool stem. (Thanks to my … [Read more...]
Pet Pumpkin Rocks
So my husband and I carved our pumpkins a little early. :) Why you wonder? Because these are our little Pet Pumpkin Rocks and they will last until Halloween! See that one in the back there? The one with the vampire teeth? His name is Edward. :) So these are SUPER easy to make. You know me, I keep my projects short and simple. The longest time for this one is waiting for the paint to dry. Here's what you need: 1 can each Orange and Green Spray paint Various sizes and shapes medium sized rocks for the pumpkins Smaller rocks for the stems Sharpie Permanent Marker E6000 adhesive To get started, wash and scrub your rocks … [Read more...]